 Save
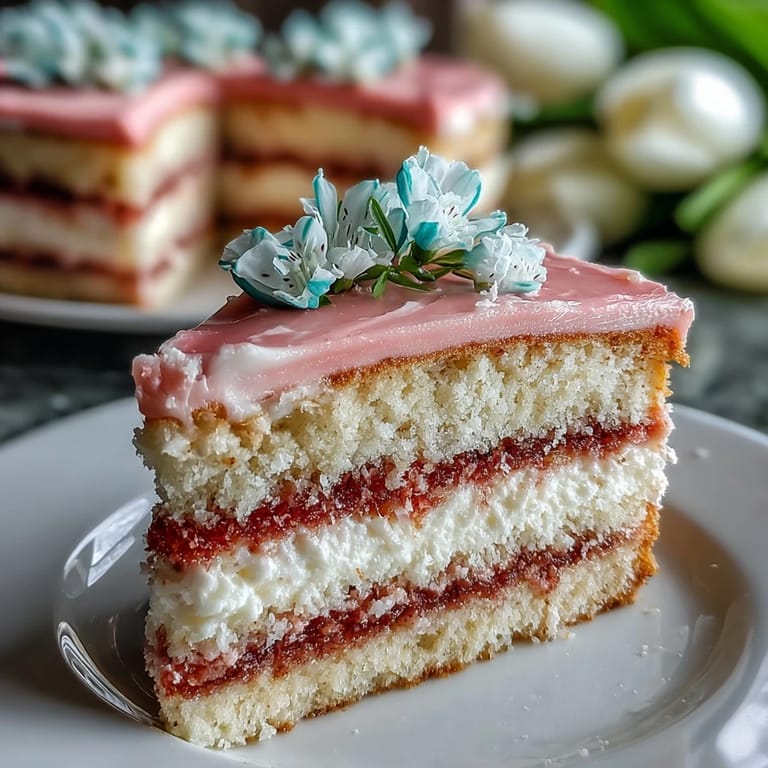
Save There's something about pastel colors that makes you want to create something beautiful, and this ombre cake showed up in my life during a particularly gray March afternoon. My neighbor mentioned she was hosting a spring brunch, and instead of bringing the usual thing, I decided to attempt layers of soft pink and yellow fading into each other like a sunset. The first time I pulled it from the oven, the kitchen smelled like vanilla and butter, and I knew I'd stumbled onto something worth repeating.
I'll never forget my friend Sarah's face when she saw it sitting on the table that spring morning. She literally gasped, then immediately asked if I could make one for her daughter's birthday party two weeks later. That's when I realized this cake had become my thing, the one people specifically request when they want something that tastes as good as it looks.
Ingredients
- All-purpose flour (3 cups): This is your foundation, and measuring by weight gives you consistency that cup measurements sometimes fumble.
- Baking powder (2 ½ tsp): Don't skip or reduce this; it's what keeps the layers tender and helps them rise evenly so your ombre effect stays visible.
- Salt (½ tsp): This tiny amount actually makes the colors pop and balances the sweetness in a way that feels almost secret.
- Unsalted butter (1 cup for batter, 1 ½ cups for frosting): Room temperature is non-negotiable here; cold butter refuses to cream properly and you'll end up with a dense cake.
- Granulated sugar (2 cups): This creams with butter to create that light, fluffy texture that makes each bite almost cloud-like.
- Eggs (4 large): Room temperature eggs incorporate more smoothly and create a more stable, tender crumb than cold ones.
- Pure vanilla extract (1 tbsp for batter, 2 tsp for frosting): Real vanilla matters here because the color is so pale and delicate that synthetic vanilla tastes slightly off by comparison.
- Whole milk (1 cup): The liquid that brings everything together; warm milk helps it blend seamlessly without deflating the butter mixture.
- Gel food coloring (pink and yellow): Gel is essential because liquid coloring makes the batter watery and ruins your careful measurements.
- Powdered sugar (5 cups): Sift it first so you don't end up with lumpy frosting that fights you during decorating.
- Milk or heavy cream (3-4 tbsp): This adjusts the frosting consistency; use less for stacking, more for a spreadable ombre effect.
Tired of Takeout? 🥡
Get 10 meals you can make faster than delivery arrives. Seriously.
One email. No spam. Unsubscribe anytime.
Instructions
- Prepare your pans like you mean it:
- Preheat your oven to 350°F and grease those three 8-inch round pans thoroughly, then line them with parchment paper cut to fit the bottoms. This prevents sticking and makes unmolding feel less like a high-wire act.
- Mix your dry ingredients separately:
- Whisk flour, baking powder, and salt together in a medium bowl so the leavening distributes evenly. This step takes two minutes and saves you from dense patches in your finished cake.
- Cream butter and sugar until it transforms:
- In a large bowl, beat the room-temperature butter and sugar on medium speed for 3 to 4 minutes until it's pale, fluffy, and almost doubles in volume. You'll see and feel the difference; it should look like fluffy clouds.
- Add eggs with patience:
- Add eggs one at a time, beating well after each addition, then mix in the vanilla extract. Going slowly prevents the mixture from separating and keeps your batter smooth.
- Alternate flour and milk gently:
- Add the flour mixture and milk in three additions total, starting and ending with flour, mixing just until combined after each addition. Overmixing develops gluten and creates a tough cake, so stop as soon as you don't see streaks of flour.
- Divide and tint your batters:
- Split the batter into three bowls and add a tiny amount of pink gel coloring to one, yellow to another, and leave the third plain or pale peach if you're feeling artistic. Start with just a toothpick's worth of color and add more until you like how it looks.
- Bake with attention:
- Pour each colored batter into its prepared pan, smooth the tops, and bake for 22 to 26 minutes until a toothpick inserted into the center comes out clean. The exact time depends on your oven, so start checking at 22 minutes.
- Cool with respect for the process:
- Let cakes cool in their pans for 10 minutes, then turn them out onto wire racks to cool completely. Rushing this step leads to crumbly layers that break during assembly.
- Make your frosting silk:
- Beat room-temperature butter on medium-high speed until creamy, then gradually add sifted powdered sugar, vanilla, salt, and 3 tablespoons of milk or cream, beating until fluffy. Add more milk a teaspoon at a time if you need it softer.
- Tint your frosting:
- Divide the frosting into three bowls and tint them to match your cake layers using tiny amounts of gel coloring. Make the pastels slightly lighter than your cake layers so the gradient reads clearly.
- Level and layer with intention:
- If your cakes domed slightly while baking, level them gently with a serrated knife, then place the yellow layer on your serving plate. Spread with yellow frosting, top with the plain or peach layer, frost that with plain frosting, then top with the pink layer and frost it with pink frosting.
- Create the ombre magic:
- Use your remaining frosting to blend the sides from yellow at the base to pink at the top, working a small section at a time and using an offset spatula or cake scraper to smooth and blend. The blending is what makes it an ombre rather than just three colors, so take your time and let colors kiss where they meet.
- Decorate and chill:
- Add pastel sprinkles, edible flowers, or whatever feels right to you, then refrigerate for at least 30 minutes before slicing. This resting time lets everything set and gives you cleaner cuts.
 Save
Save What I love most is watching someone cut into it for the first time and see that moment of realization—the colors fade from one to the next in this gentle, intentional way that feels almost too pretty to eat. Almost, but then they taste it and forget about the looks entirely.
The Science of Soft Colors
Gel food coloring matters because it's concentrated without the water content that liquid food coloring brings, and that water can actually alter your batter consistency and affect how the cake bakes. I learned this the hard way the second time I made this, when I used liquid coloring to save time and ended up with cake layers that baked unevenly and one corner that stayed slightly gummy. Gel coloring also creates those true pastels without needing to add white coloring or extra flour, which keeps your cake structure intact and your flavor clean.
Temperature Makes Everything Easier
There's a reason every instruction mentions room temperature, and it's not just kitchen folklore. Butter at room temperature actually incorporates air when you cream it, which is what makes the cake tender rather than dense. Cold eggs don't blend smoothly into that creamed mixture, creating tiny specks of egg white throughout the batter that bake into unpleasant little pockets. Warm milk helps it dissolve into the alternating additions rather than sitting as a separate layer that causes the batter to break. I started paying attention to this after my third attempt, when I pulled a cake from the oven that was somehow both dry and dense, and realized I'd grabbed butter straight from the fridge out of habit.
Blending the Ombre Takes Patience
The ombre effect is really just about frosting the sides in a way that lets colors blend where they meet, and it sounds fancy but it's actually about working slowly and not overthinking it. Use an offset spatula or cake scraper to spread frosting around the outside, working in small sections and using the same tool to blend where the yellow meets the peach, and where the peach meets the pink. This isn't about making it perfectly gradient; it's about creating the impression of a gradient, and that impression is what makes people's eyes light up.
- Work on a turntable if you have one because rotating the cake while frosting makes blending feel intuitive rather than awkward.
- If you make a mistake in the frosting, just keep working it with your spatula because frosting is forgiving and most mistakes smooth out if you're patient.
- The chilling time before serving isn't just so you can get cleaner cuts; it's also when the colors settle and the whole effect looks intentional and polished.
 Save
Save This cake has become my answer to spring celebrations, and the best part is how it tastes as good as it looks. Every time someone takes a slice, they're not just eating cake; they're experiencing that moment of realizing that something this beautiful is also genuinely delicious.
Recipe FAQ
- → How do I achieve the pastel ombre effect?
Divide the batter into three portions and gently tint each with pink, yellow, and an optional peach mixture. Layer them carefully in pans to create the gradient once baked.
- → What is best for frosting to match the layers?
A smooth buttercream is tinted to match the cake layers in pastel pink, yellow, and a plain shade for a cohesive appearance and creamy texture.
- → Can the cake be made ahead of time?
Yes, store the finished cake covered at room temperature for a day or refrigerate for up to four days to maintain freshness.
- → Are there any recommended flavor pairings?
This light-layered sponge pairs beautifully with Moscato wine or sparkling lemonade, enhancing its delicate sweetness.
- → What tools are needed for assembly and decoration?
Use round cake pans, an electric mixer, offset spatula, cake scraper, and parchment paper for best results in baking and smooth layering.